
| Statistics |
Total online: 1 Guests: 1 Users: 0 |
|
 | |  |
| | Home » Power » 0-24V DC Digital PIC Power Supply
10:41 0-24V DC Digital PIC Power Supply |
This is a variable power supply controlled with PIC microcontroller. There is LCD display in this circuit which will show the actual value of power supply output. This power supply use push on switch to adjust the output voltage and current value.
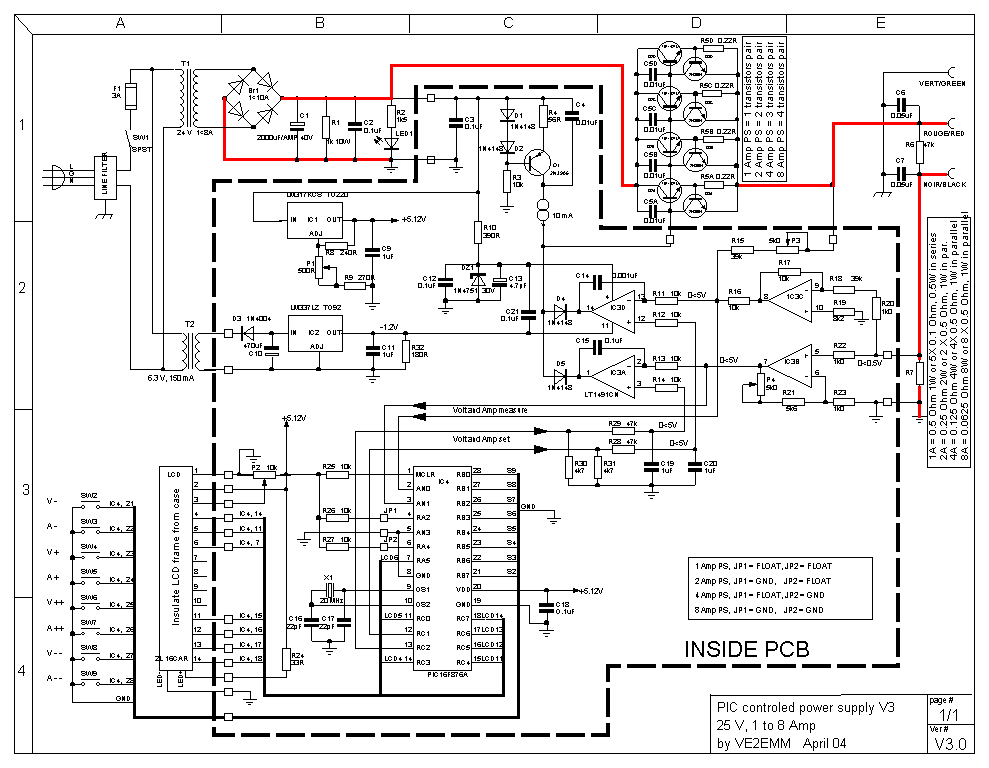
Schematic Diagram:
Component List: C1 = 2000uF per AMP, 40V (adjust capacity to power supply amps) C2,C3,C12,C15,C18,C21 = 0.1uF CER C4 = 0.01uF CER C5A,C5B,C5C,C5D = 0.01uF CER C6,C7 = 0.05uF CER C8 = Not used C9,C11,C19,C20 = 1uF CER C10 = 470uF 15V EL RADIAL C13 = 4.7µF 50V EL RADIAL C14 = 0.001uF CER C16,C17 = 22pF CER
D1,D2,D4,D5 = 1N4148 D3 = 1N4004 Br1 = 1<10A BRIDGE RECTIFIER (adjust seize to power supply amps) DZ1 = 1N4751 30V ZENER IC1 = LM317KCS TO220 IC2 = LM337LZ TO92 IC3 = LT1491CN special HV opamp, do not substitute IC4 = PIC16F876A Q1 = 2N3906 Q2A to Q2D = TIP142TU 1 to 5 transistors (adjust quantity to power supply amps) Q3A to Q3D = 2N3904 (adjust quantity to power supply amps)
X1 = 20 mHz HC49 DigiKey PN: 300-6042-ND
LED1 = T1 3/4 RED OR GREEN LED LCD = LCD, 2X16, HD44780 intelligent controller DigiKey PN: 67-1758-ND insulate from case
P1 = 500 Ohms P2 = 10 kOhms P3,P4 = 5 kOhms
R1 = 1 kOhms 10W R2 = 1.5 kOhms R3,R11,R12,R13,R14,R16,R17,R25,R26,R27 = 10 kOhms R4 = 56 Ohms R5A to R5D = 0.22 Ohms (adjust quantity to power supply amps) R6,R28,R29 = 47k Ohms R7 = as per schematic (adjust value to power supply amps) R8 = 240 Ohms R9 = 270 Ohms R10 = 390 Ohms R15 = 39 kOhms R18 = 39 kOhms R19 = 8.2 kOhms R20,R22,R23,R32 = 1 kOhms R21 = 5.6 kOhms R24 = 33 Ohms 1/2W R30,R31 = 4.7 kOhms
SW1 = SPST min toggle SW2,SW3,SW4,SW5,SW6,SW7,SW8,SW9 = NO_SP push button T1 = 24 V 1<8A (adjust seize to power supply amps) T2 = 6.3 V, 150 mA
MISC: 3 Terminals Transistors Heat Sink, up to: 1A = 30W, 2A = 60W, 4A = 120W, 8A = 240W to dissipate Line filter, Case PCB, IC sockets…
PCB Layout: Top side:  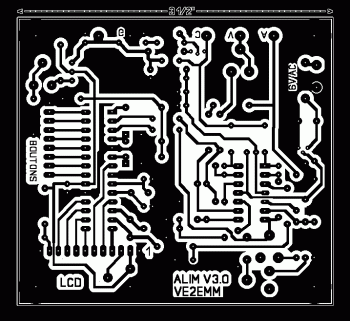 VOLTAGE:
Ajustable from 0 < 25 Volts at a resolution of 100 mV.
CURRENT: choice of 4 ranges;
0 < 1.000A at a resolution of 1 mA. JP1 and JP2 open, C1 = 2000uF filter cap., R7 = 0.5 Ohm, T1 = 24V, 1Amp. 0 < 2.000A at a resolution of 2 mA. JP1 ground and JP2 open, C1 = 4000uF filter cap., R7 = 0.25 Ohm, T1 = 24V, 2Amp. 0 < 4.000A at a resolution of 4 mA. JP1 open and JP2 ground, C1 = 8000uF filter cap., R7 = 0.125 Ohm, T1 = 24V, 4Amp. 0 < 8.000A at a resolution of 8 mA. JP1 and JP2 ground, C1 = 16000uF filter cap., R7 = 0.0625 Ohm, T1 = 24V, 8Amp. 2 lines LCD display:
The top line shows the settings, the maximum current stays displayed at all times, it is not necessary to short the output terminals to set the maximum current. The bottom line shows the measured values. The arrows at the bottom center line show who is in control, the voltage or the current. Adjustments:
Voltage, steps of 1 V and 0.1 V. Current, steps of 1, 2, 4, 8 mA and 50, 100, 200, 400 mA depending on the Amp range. Memorisation of the last settings before power off, restarting with thoses same settings. Download the full document include schematic diagram, reference, pcb layout and program source code HERE |
|
Category: Power |
Views: 8840 |
|
| |
 | |  |
|
|
| |


