Controlling the circuit is very simple. Sw1 switches between record and playback modes. Push button B1 is used for start and pause functions. B2 stops the process.
To record voice, first move Sw1 to the record position and then push B1 once. IC will start recording and during this process red LED will bright. One push to B1 pauses and second push continues recording. You can record 60 seconds by this way. To stop recording push B2.
To listen the voice recorded before, move Sw1 to playback position then push B1. During the playback process red LED will bright again. One push to B1 pauses and second push continues playing. To stop playback push B2.
There are some other operating modes for ISD2560P. Mode choice is done by the 7 numbered pin of the IC. For instance if you want to play the voice repeatedly, 7 and 4 numbered pins must be connected to +5V. Another mode is recording and playing only during pushing B1 button. To switch this mode, connect the only 6 numbered pin to +5V.

Supply voltage of the circuit is +9V that is supplied by a 9V battery or 9V AC/DC adapter.But since ISD2560P requires +5V, we use a voltage regulator in our circuit. You can see the supply part of the circuit based on 7805 regulator in the figure.

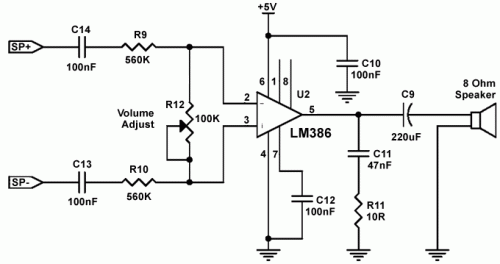
ISD2560P IC includes an amplifier to drive a 16 OAmplifier Parthm speaker but the output volume is not sufficiently enough. So instead of a 16 Ohm speaker, an amplifier circuit must be connected to the output. You can see the amplifier part of the circuit based on LM386 in the figure. SP+ and SP- pins must be connected to 14 and 15 numbered pins of ISD2560P. A 100K potentiometer is used to adjust the output volume. If the output of the amplifier is connected to a 8 Ohm speaker, then much higher volume will be taken.


