You can measure temperature using various methods like : analog circuits , digital circuits or some other methods . This electronic project is a very simple thermometer that is based on the PIC16F84A microcontroller , designed by Microchip . Why to use a thermometer that is designed using a microcontroller and not a classic analog thermometer ? because you can design a complex solution using few external components , resulting an low cost application that provide a high precision measurement . This Digital thermometer microcontroller project use watchdog timer function to measure temperature . The WDT on all PICmicro microcontrollers has a nominal time-out period of 18 ms. The WDT time-out period varies with temperature, VDD and part-to-part process variations. Without using a separate temperature sensor, it is possible to calculate the temperature with reasonable accuracy using the WDT time-out period. To translate the environment temperature into an actual reading, the system must be able to do the following: • Provide a method for establishing time-out to temperature calibration • Count the number of WDT time-outs for a given period of time • Equate the number of time-outs to a temperature
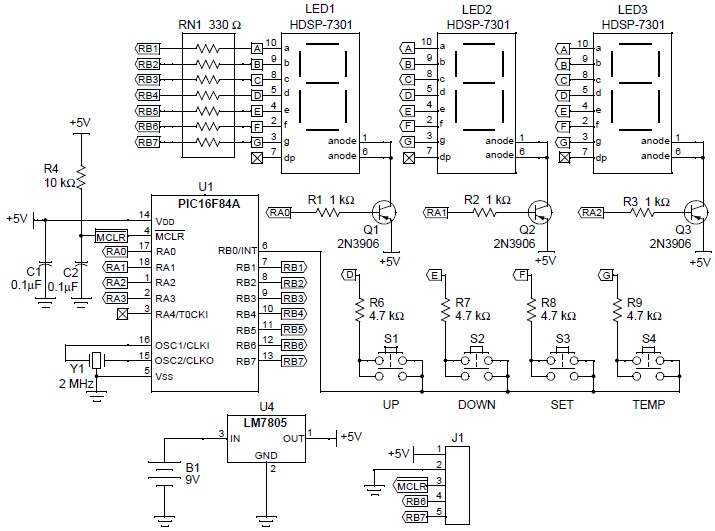
The system design also includes wake-on-interrupt key scanning and temperature display. The circuit diagram is built around a PIC16F84A microcontroller, three seven segment LEDs to display temperature. The common anode of each LCD is connected to PORTA<2:0> through PNP transistors, which are used to source the current for each digit. The entire device operates on a single 9V battery.
The PIC16F84A microcontroller is normally in SLEEP mode, consuming very little operating current but if any key is pressed, it ‘wakes up’ from SLEEP and updates the WDT count, and checks for additional key presses. If there are none, it returns to SLEEP mode. The WDT Thermometer has three distinct operating modes: SLEEP Mode: This is the default mode the system starts in when power is applied . Display Mode: When the TEMP key is pressed, the system wakes up and the LEDs show the temperature in degrees Centigrade. Calibration Mode: This mode creates a set of new calibration values, in addition to those present in the firmware. To calibrate the device you must to : 1. Place the system in the temperature forcing system at the higher of the two calibration temperatures, and wait 5 minutes for the temperature to stabilize. 2. Press and hold the SET key while applying power to the system. 3. Press either the UP or DOWN key to increase or decrease the displayed temperature setting by one degree to match the actual temperature. 4. Press the SET key. The new high temperature calibration is stored in data EEPROM. 5. Change the temperature of the forcing system to the low calibration temperature (allow 5 minutes for the temperature to stabilize). 6. Press either the UP or DOWN key to increase or decrease the displayed temperature setting by one degree to match the current temperature. 7. Press the SET key. The new low temperature calibration is stored in data EEPROM, and the firmware sets a flag (Default) to indicate that new calibration information is available. 8. To return to the preprogrammed calibration at any time during this process, press the TEMP key. This project ( hardware and software ) was designed by Leena Chaudhari from Microchip Technology Inc. |